Installation
![]() Please view our Installation Manual for full details on TrailPad installation.
Please view our Installation Manual for full details on TrailPad installation.
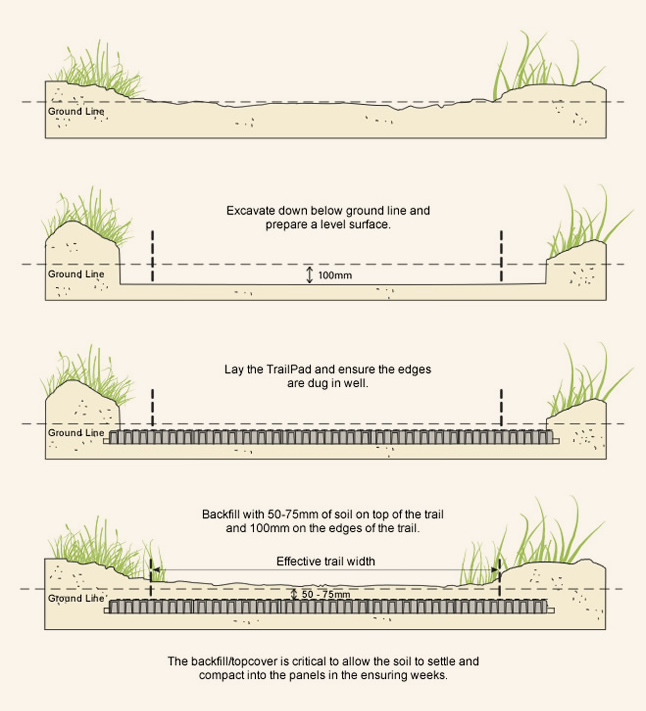
Preparing the Foundation
- Use a mini-excavator with an adjustable head bucket to create a FLAT foundation surface.
* If using a rubber tracked mini-excavator, use it to ‘bed in’ the panels, i.e. into the sand foundation then back fill over the top of that. - Have a person following the mini-excavator along in the first place. Use an “aluminium placer”, i.e. concreter’s screed, the hand-held via long shovel type handle version.
- On long curves, continue laying in straight lines - DO NOT try to follow the curve of the trail unless you can do it at full width. The danger here is that if you don’t do it at full width, you won't be able to get the single pads installed on the inner or outer parts of the trail, i.e. too narrow or wide a gap.
- COMPLETE the TrailPad ‘front’ as you go along. Do not have huge advances along the track without filling in the single panels first as you may not be able to get them in. Use your hammer to drive the pin in when the panel hole alignment is not perfect.
- Pre-assemblies are good but are track dependant, i.e. you can pre-assemble on a large flat surface at the trail head (a) rectangular sections of 4 W x 8 L, or (b) a parallelogram of 3 W x 8 L, or (c) ‘flowers’ of 7 will need to have 2 added to one end to form an ‘arrow shape’.
- Work from the inside out, i.e. 2 or 3 joints, but NEVER end with a 4 joint. A 3 joint is easy to get a single panel into but a 4 joint can be VERY HARD/impossible, dependant upon the
gradient and side slope. - When cutting the pads to make ½ width sections or 1-1 or 2-2’s, turn them upside down. It is easier to ensure you cut beside the centre line, not in/through it.
Procedure Summary